
DO-3D > Chapter V
Things are a bit more complex
than they should be relating to the previous explanations.
The fact is that
not all images can be converted.
Images with strong
contrast zones are definitively not adapted.
They produce what stereo
addicts call "ghosts".
Strong contrast zones produce
anaglyphs with too close and too strong red and cyan spots.
This produce a
very uncomfortable sensation through the red-cyan glasses.
Images with large
zones of saturated colors will produce "ghosts" too. The exact name of this trouble (that produces a visual flashy effect quite different from the "ghosts" from contrast) is : retinal rivalry.
All the left
information comes from one color, red.
If your image has large red zones,
there will be no information (No green nor blue) for the right eye about those
zones.
No stereo effect will appear there.
The same trouble happens with
green and blue zones.
There is nothing to do for images with strong contrast
(excepted creating the same image without the strong contrast . . .).
For
example, you can change a black background into a grey background or you can try
to change the lighting), even though it is still possible to use images with
saturated colors.
If those saturated zones were gray there should be no
problems as all the three bands should be the same on the zones.
Thus, We have to find a solution
that will shift colors to grays but, yet respect the balance of space
information between the two eyes.
This solution should also respect the
original colors (if possible) and the three bands.
The solution will be to
modify the saturation of the images.
Modifying saturation will allow us to
modify the quantity of colors in an image by keeping for the resulting image
only a few percentages of colors from the original image.
Notice that fully
decreasing saturation turns the image into some kind of black and white version
still coded on RGB.
The correct way to produce really black and white
images is to use a dedicated tool as the formula used to get
one value from three is not calculating the average value but using the following formula :
black and white = 0.30 red + 0.59 green + 0.11
blue.
0.30, 0.59 and 0.11 are values related to the sensitivity of the human
eye.
A tool converting into black and white will allow us directly
to produce black and white stereo images.
Here is an example of a picture with high saturated spots. The small balls inside the "meteor" are of bright red, green, blue and yellow :
If you directly convert the corresponding stereo pair to a color anaglyph, there are numerous saturated zones which are uncomfortable to view. If you first convert the stereo pair to black and white images then create the anaglyph, this anaglyph have, of course, no saturated zones which are uncomfortable to view and his fully comfortable :


black and white conversion is the ultimate weapon against saturated spots.
The trouble is it
wipes all colors.
It would be better if it were possible to modify the
colors wiping only the spots that produce "ghosts".
A way to do this is to use an
image processing software to change the hue or to reduce the saturation of the
spots before producing the anaglyph.
The fact is that despite using an image
processing software, fighting the ghosts "by hand" spot by spot or by try and error can be long.
This does not suit our
original aim to produce stereo images in a quick way.
A way to speed-up color correction is to turn the reds into yellows. This is achieved by using the red layer of the right image to fill the green layer of the anaglyph.
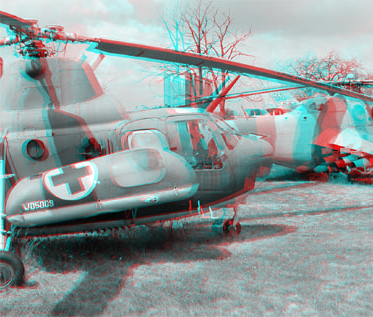
This is OK if you have big red spots, such as in the Red Cross example below, but as it tends to turn the browns into yellows, and also saturated greens to black, it might not be suitable for most images.

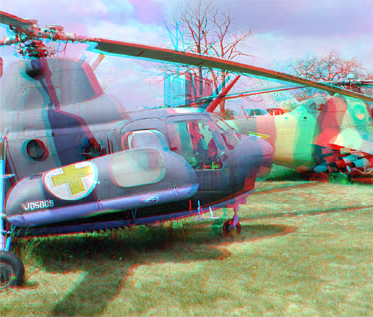
A goof exemple of red to yellow stereo conversion.
Sample picture from http://www.geocities.com/lebouttedidier/avions.html

A not so good example of red to yellow stereo conversion

There is however another solution, still working by changing the whole color layers, allowing to produce "perfect" color anaglyphs in a snap, whatever the color spots.
Why "perfect" with quotes ? Because there are different levels of perfection. The Automateac method is perfect in the meaning : will automatically and easily solve ALL color troubles for ALL anaglyphs. Now, of course there will be color shifts and, in some cases, you might achieve a "better" result using another method, with "better" in the meaning : with more aesthetic contrasts and color shifts in your opinion.
Below is a sample showing you the kind of result achieved with the Automateac method. The idea is to turn the reds to the closest totally comfortable anaglyphic color, which is a dark brown. A side effect of the method is to reduce the saturation of greens and yellows, as brown is in fact a dark yellow, which itself is a mix of red and green.
Note that absolutely ALL flashing spots from the original image are removed in the "perfect" anaglyphic. Regarding brightness and constrasts, all colors are as close as possible to the original when you compare both pictures seen through anaglyphic glasses.
|
 |
| The original colors with color ghosting. | The "perfect automatic" anaglyph. |
|
 |
The table below compare the four anaglyphic solutions between them and to the original colors (in the middle). From left to right the four solutions are : direct RGB, Black & White, Red to Yellow and Automateac.
|
|
|
|
|
|
 |
 |
|
|
|
|
The Automateac method is for professionnals as it is not free. We sell it ± $expensive. If you dont have the money to buy the method, don't be frustrated : you simply don't have the need for it and the other methods are enough regarding the quality you're looking for and time you can spend. |
ChromaTune-3D™ process of ByteMyzer is a very good one, mainly since it was improved due to my constructive critic that the green objects turned into somewhat the same color than the yellow objects. Below is was the difference on the green objects between the old ChromaTune-3D™ rendering and the Automateac rendering until january the 7th 2008 when i was given notice by ByteMyzer Softwerx that :
so... images was removed but reference was kept, as opinions about products, or methods, are NOT under Trademark (it is under « freedom of expression », and, by the way, here is a personnal message for Bill Gates and Microsoft company : Bill, i'm not using your Office Pack software as i find that the OpenOffice pack, which is free and open source in addition, is by far superior to your company software.)
.
As the original stereo pair is not available, the Automateac process was applied "flat" to show the color shifting.
Put your anaglyph glasses on to see the color differences on the green "fire-men" between the two process :
|
ChromaTune-3D™ image hosted at http://farm2.static.flickr.com/1108/917508396_a25636fcb5.jpg?v=0
|
The ChromaTune-3D™ rendered the "fire-men" with an almost completely yellow uniform (helmet, jacket, gloves, belt, trousers and boots) when the Automateac process keeps the difference between the yellow gloves, belt and boots with the rest of the uniform which is green. The new version of ChromaTune-3D™ including my suggestion to keep the difference between the greens and yellows is now very similar to the Automateac rendering. ChromaTune-3D™ seems to increase luminosity, then on this example the Automateac image luminosity was increased by 25%.
Should you whish to have much more (too much ?) choices about how to precisely tune each color, or would like to create many different anaglyph versions from a pair, you can use Anabuilder.
All those tricks should allow
you to find quickly a comfortable anaglyphic version from most of your stereo
pairs and choose the processing method that, in your opinion, keeps the best color definition for what a color anaglyph is supposed to be.

